Monday, May 18, 2009

Guest Post: Bunny's Retro Banana Cream Pie

Photobucket

This wonderful guest post is from the awesome Bunny of Bunny's Warm Oven. Enjoy!


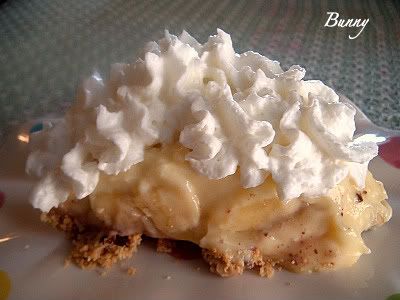
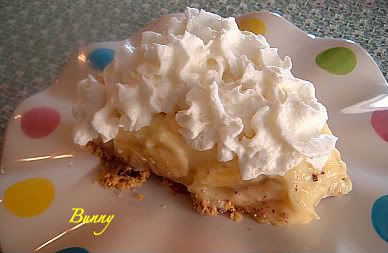
I can't even begin to tell you how much I enjoyed this. All the elements of this pie came together to make the best Banana Cream Pie I've ever made. I'm going to describe what that first bite of pie was like.... The graham cracker crust is thick and crunchy with a thin layer of chocolate. The vanilla filling is cool and smooth, sweet but not overly sweet, allowing the banana flavor to come bursting through and take center stage. The sinfully light whipped cream adds another layer of cool silky smoothness and your mouth is happy...very ,very happy. The combination is unbelievable, I had to restrain myself from going back to it over and over again! I don't even want to admit how much I ate... LOL!!

Photobucket

This pie was easy to make, don't let the homemade vanilla filling scare you away, the toughest part of making it was standing at the stove waiting for it to thicken!! Once you taste the filling your mind will be whirling thinking of other desserts you can make with it...yeah it's that good! Put it between layers of a cake, make a trifle with it, make a parfait for the kids with berries. The possibilities are endless. I hope you enjoy this as much as I did, thank you again Megan for the opportunity to share with you and your friends!

Retro Banana Cream Pie

1-1/2 cups (375 mL) graham wafer crumbs
1/3 cup (75 mL) butter, melted
2 oz (60 g) semisweet chocolate, melted

Filling:
4 egg yolks
1/2 cup (125 mL) granulated sugar
1/3 cup (75 mL) cornstarch
3 cups (750 mL) milk
2 tbsp (25 mL) butter
1 tsp (5 mL) vanilla
2 small bananas, sliced

Garnish:
1 cup (250 mL) whipping cream
2 tbsp (25 mL) grated semisweet chocolate

Preparation:

Filling: In bowl, whisk together egg yolks, sugar, cornstarch and 1/2 cup (125 mL) of the milk; set aside.

In heavy saucepan, heat remaining milk over medium heat until bubbles form around edge; whisk into yolk mixture. Return to pan and cook over medium-low heat, stirring, until thick enough to mound on spoon, about 5 minutes. Stir in butter and vanilla. Scrape into bowl. Place plastic wrap directly on surface; refrigerate just until cooled, about 2 hours.

In bowl, stir graham wafer crumbs with butter until moistened; press onto bottom and up side of 9-inch (23 cm) pie plate. Refrigerate until firm, about 30 minutes.

Drizzle melted chocolate over bottom of crust; spread evenly with back of spoon. Refrigerate until set, about 10 minutes. Without stirring custard, spoon half over chocolate. Arrange banana slices over top, overlapping slightly. Top with remaining custard. Place plastic wrap directly on surface; refrigerate until cold, about 2 hours. (Make-ahead: Refrigerate for up to 12 hours.)

Garnish: In bowl, whip cream. Using piping bag or with spatula, pipe into rosettes or spread to cover top. Sprinkle with grated chocolate. (Make-ahead: Insert 6 toothpicks into pie; drape plastic wrap loosely over top and refrigerate for up to 4 hours.)

Subscribe here to get your free daily updates to Megan's Munchies!

Saturday, May 16, 2009

Cinnamon Raisin Pastry Rounds

I have always loved anything with cinnamon and raisins! The two flavors pair so well together. These treats will definitely satisfy a cinnamon raisin craving, and they fill the house with an amazing cinnamon aroma while they are baking. These would be perfect in the morning with a cup of coffee!

Cinnamon Raisin Pastry Rounds

1 can (8 oz) refrigerated crescent dinner rolls
1/3 cup raisins
1/4 cup butter or margarine, melted
1/4 cup sugar
1 tsp cinnamon

Directions:
Heat oven to 375°F.
Prepare cookie sheet with cooking spray.
Unroll dough and separate into 2 rectangles.
Press perforations to seal.
Sprinkle raisins evenly over dough, pressing into dough.
Brush rectangles with half of the butter.
In small bowl, mix sugar and cinnamon.
Sprinkle half of sugar mixture evenly over dough.
Starting with one short side of each rectangle, roll up and seal edge.
Cut each roll into 3 slices.
Place each slice, cut side down, between 2 sheets of plastic wrap or waxed paper.
Press each into 5-inch round. Remove plastic wrap and place 2 inches apart on cookie sheet.
Brush rounds with remaining butter and sprinkle with remaining sugar mixture.
Bake 14 to 16 minutes or until golden brown.

Subscribe here to get your free daily updates to Megan's Munchies!

Thursday, May 14, 2009

Surprising Ways to Add Protein To Your Diet


I am always trying to slip some extra protein into my diet, because I am not much of a meat eater, and I don't get enough vegetarian sources of protein. I know I need more protein for nutrition reasons and to support my workouts. My favorite ways to use protein powder is in my oatmeal and in homemade treats, like my Protein Power Pumpkin Cookies pictured above. I see lots of food bloggers incorporating protein powder in their foods and thought you all would be interested in this article I found: 21 Foods To Mix With Protein Powder. Check out this list of food/protein powder combinations. There are some interesting ones that I would never have imagined. You will have to follow the link and read the article to see how protein powder can be combined with each of these foods. Protein powder in mashed potatoes? Really? I would love to hear more interesting ways that you all use protein powder!

  1. Milk
  2. Cream
  3. Fruit
  4. Nuts
  5. All Natural Peanut Butter
  6. Oatmeal
  7. Cereal
  8. Cottage Cheese
  9. Pancakes
  10. Dessert Mix
  11. Pudding Mix
  12. Apple Juice and Caramel Flavoring
  13. Other Juices
  14. Yogurt
  15. Pasta Sauce
  16. Eggs and Egg Whites
  17. Mashed Potatoes
  18. Sweeteners
  19. Coffee
  20. Homemade Protein Bars
Subscribe here to get your free daily updates to Megan's Munchies!

Tuesday, May 12, 2009

Under Construction

Megan's Munchies is currently under construction! A new and exciting version of my blog will hopefully be up soon, but I need your help. I love and appreciate all my readers, and I want to make my blog something you all enjoy visiting daily. What do you like and not like about my blog? What would you like to see more of.....personal info, meal recipes, more sweet treats, more of my sister's cakes, more healthy recipes? What can I do to make it more enjoyable for you all? I am open to any suggestions! Also....I am working on an About Me page. What would you like to know about me?

Subscribe here to get your free daily updates to Megan's Munchies!

Monday, May 11, 2009

Holy Yum! Caramel Banana Bread


This time around, the Holy Yum! Award goes to the sweet blogger who actually created the phrase "HOLY YUM".....Veggiegirl! She recently made a delicious caramel banana bread that looks awesome. I wish I had some now! Most of you have probably visited Veggiegirl's blog many times, but if you haven't been there yet, you need to check out her awesome video posts and all of the fabulous blondies she has made. She is the blondie queen!

Subscribe here to get your free daily updates to Megan's Munchies!

Saturday, May 9, 2009

Rubber Ducky Cake

My sister has done it again! She has created another EXTREMELY cute and impressive cake! I think this one is definitely my favorite. She used fondant for the soap, bubbles, and towel, and she used pirouette cookies for the outside of the tub. I wish she lived closer to me so she could make all the cakes for my special events during the year.

Subscribe here to get your free daily updates to Megan's Munchies!

Friday, May 8, 2009

Banana Toffee Cupcakes

These cupcakes are so rich you don't really need frosting. The banana, chocolate, and toffee flavors blend perfectly in this cupcake treat. I used the Heath toffee bits, and added more than called for in the original recipe. You can never have too much chocolate and toffee! I used a yellow cake mix this time, but I am going to use a banana cake mix next time for an even stronger banana flavor.


Banana Toffee Cupcakes
link to recipe at BettyCrocker.com

1 box yellow cake mix
1/3 cup water
1/3 cup vegetable oil
1/2 tsp almond extract
3 eggs
1 cup mashed very ripe bananas (2 medium)
3/4 cup Heath toffee bits

Directions:
Heat oven to 350°F.
Place paper baking cup in each of 24 regular-size muffin cups.
In large bowl, beat cake mix, water, oil, almond extract and eggs with electric mixer on low speed 30 seconds.
Beat on medium speed 2 minutes.
Add bananas; beat until smooth.
Stir in 1/2 cup toffee bits.
Divide batter evenly among muffin cups.
Sprinkle remaining toffee bits on top of each cupcake.
Bake about 25 minutes or until golden brown.
Immediately remove from pans to cooling racks.

Subscribe here to get your free daily updates to Megan's Munchies!

Tuesday, May 5, 2009

Cool Mint Oreo Cupcakes

I had half a bag of Cool Mint Oreos left from making the Chocolate Grasshopper Pie, so I decided to make another minty treat. I chopped up 12 of the Cool Mint Oreos and mixed them into some Devil's Food Cake Mix prepared according the directions. After a little mixing, pouring, baking and cooling.....The result was some yummy chocolate cupcakes with surprise pockets of mint chocolate cookies. So are you an Oreo fan? Do you like the original flavor or some of their fun flavor creations?

Subscribe here to get your free daily updates to Megan's Munchies!

Monday, May 4, 2009

Peanut Butter and Banana Chocolate Chip Cookies

While Zesty if off in Jamaica, I filled in with a guest post on ZestyCook. Head on over and check out these Peanut Butter and Banana Chocolate Chip Cookies. While you are there, check out some of his delicious recipes including A Chunk of Chocolate Chip Muffins, Easy Whole Wheat Bread with Molasses, and Savory BBQ Turkey Burgers.

You can also check out the Zesty Clothing Line which benefits a local food bank. Don't forget to get your free Simply Zesty Recipe e-book full of recipes from some of your favorite food bloggers, including my recipe for Pumpkin Chocolate Chip Protein Cookies.

Subscribe here to get your free daily updates to Megan's Munchies!

Saturday, May 2, 2009

Amazing Cakes

I haven't shared any of my sister's awesome cake creations lately, and I decided it was time. Her cake business Hugs, Kisses, and Cakes is quite busy right now with baby shower cake requests. She recently had a request for an ultrasound to adorn the top of a cake. Is this a new trend? I have never heard of this idea before! Guess what? She did it. My sister created an edible image of the ultrasound and here is her cake creation!

Subscribe here to get your free daily updates to Megan's Munchies!

Friday, May 1, 2009

Calling All Mint Lovers

This is a delicious and easy to make pie for the mint lovers out there! The recipe called for pistachio pudding, which confused me a little, but it definitely gives the pie a nice minty green color. You don't taste the pistachio flavor at all. Chunks of cool mint Oreos are scattered throughout the fluffy pie filling and add just enough mint flavor and crunch. I bet this would taste good if made with Girl Scout Thin Mints. I will have to try that next time. If frozen, this pie tastes like a Mint Chocolate Cookie Ice Cream Pie. Enjoy!


Chocolate Mint Grasshopper Pie
recipe link @ kraftfoods.com

1-1/2 cups cold milk
1 pkg. (4-serving size) pistachio flavor instant pudding
2 cups thawed whipped topping, divided
6 Double Stuff Oreo Cool Mint Creme Chocolate Sandwich Cookies, chopped
1 chocolate pie crust (6 oz.)
1 square semi-sweet chocolate

Directions:
Pour milk into large bowl. Add dry pudding mix. Beat with wire whisk 2 min. or until well blended. Gently stir in 1-1/2 cups of the whipped topping and the chopped cookies. Spoon into crust. Spread with remaining 1/2 cup whipped topping.

Melt chocolate as directed on package; drizzle over pie.

Refrigerate 2 hours or freeze until firm. If frozen, remove pie from freezer about 10 min. before serving; let stand at room temperature to soften slightly. Store leftovers in refrigerator or freezer.

Subscribe here to get your free daily updates to Megan's Munchies!